Fixing Ubuntu 9.04 VPN - Adding remote network to routing table
07Jul 2009
Fixing Ubuntu 9.04 VPN - Adding remote network to routing table
by Craig Mayhew on Tue 7th Jul 2009 under Guides/Fixes, Linux/UbuntuThe new network manager is a massive improvement over the previous network tools in Ubuntu. Coming from a windows background I am used to routing tables being updated automatically. However, after connecting to a VPN using the Ubuntu 9.04 network manager I'm unable to access or even ping anything on the remote network, yet the VPN is connected. This is due to the computer not knowing about the computers on the VPN. This is where routing tables come into play. My works ip range is 192.168.10.* so this needs to be added to the routing table.
The easiest way to do this is to have the network manager handle it all by adding a setting in the network manager like so:
Click on the network manager icon then "VPN Connections" and the following menu should appear: Click "Configure VPN".

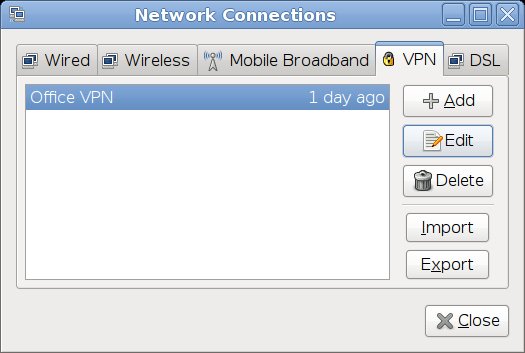
Click the VPN tab. The VPN you have already created should appear in the list. Click your VPN and then click edit.

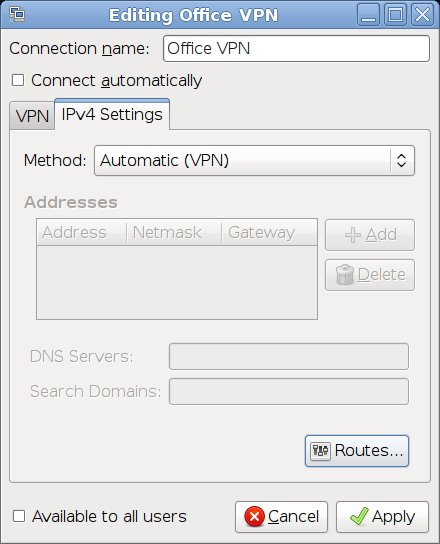
Another window should appear, click the "IPv4 Settings" tab. Then click the "Routes..." button.

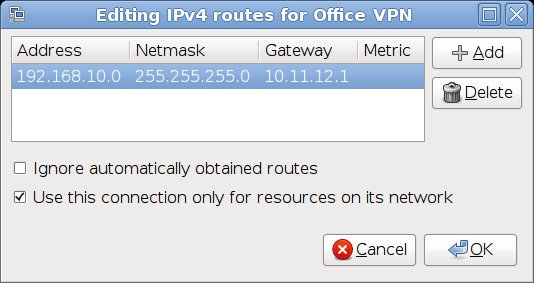
Now you need to add a route so your computer can talk to other computers on the VPN. In this case I have added the address as 192.168.10.0 as all computers on the office network have an IP that begins with "192.168.10" and a netmask of 255.255.255.0. The gateway is the IP of my home router, in this case my home router is "10.11.12.1".

At this point it's also worth mentioning as a side note that if "Use this connection only for resources on its network" is NOT ticked then all of your regular internet traffic will go via the VPN and not just when you want to access something on VPN like shared files and folders. This would really slow down your internet access. I personally would have this ticked.
And there you have it, that will now allow your computer to talk to other computers on the office/remote network.
For those of you who want a more hands on approach and really want to see whats going on behind the scenes (everyone else stop reading here):
Run the route command to view the routing table:
This is the route table with the missing route:
The network manager automatically adds the correct route to the routing table when the VPN connection is created. You can achieve the same result with the following command. In this case we are using the network range 192.168.10.*:
Now check the routes table again:
And here we have a route that allows us to access computers on the remote network:
VPN Client Ubuntu 9.04 Network Manager Routing Table
The easiest way to do this is to have the network manager handle it all by adding a setting in the network manager like so:
Click on the network manager icon then "VPN Connections" and the following menu should appear: Click "Configure VPN".

Click the VPN tab. The VPN you have already created should appear in the list. Click your VPN and then click edit.

Another window should appear, click the "IPv4 Settings" tab. Then click the "Routes..." button.

Now you need to add a route so your computer can talk to other computers on the VPN. In this case I have added the address as 192.168.10.0 as all computers on the office network have an IP that begins with "192.168.10" and a netmask of 255.255.255.0. The gateway is the IP of my home router, in this case my home router is "10.11.12.1".

At this point it's also worth mentioning as a side note that if "Use this connection only for resources on its network" is NOT ticked then all of your regular internet traffic will go via the VPN and not just when you want to access something on VPN like shared files and folders. This would really slow down your internet access. I personally would have this ticked.
And there you have it, that will now allow your computer to talk to other computers on the office/remote network.
For those of you who want a more hands on approach and really want to see whats going on behind the scenes (everyone else stop reading here):
Run the route command to view the routing table:
route
This is the route table with the missing route:
Kernel IP routing table

Destination     Gateway         Genmask         Flags Metric Ref    Use Iface

office.mywork   my.router       255.255.255.255 UGH   0      0        0 eth2

10.11.0.0       *               255.255.0.0     U     1      0        0 eth2

link-local      *               255.255.0.0     U     1000   0        0 eth2

default         my.router       0.0.0.0         UG    0      0        0 eth2
The network manager automatically adds the correct route to the routing table when the VPN connection is created. You can achieve the same result with the following command. In this case we are using the network range 192.168.10.*:
sudo route add -net 192.168.10.0/24 ppp0
Now check the routes table again:
route
And here we have a route that allows us to access computers on the remote network:
Kernel IP routing table

Destination     Gateway         Genmask         Flags Metric Ref    Use Iface

office.mywork   10.11.12.1      255.255.255.255 UGH   0      0        0 eth2

192.168.10.0    *               255.255.255.0   U     0      0        0 ppp0

10.11.0.0       *               255.255.0.0     U     1      0        0 eth2

link-local      *               255.255.0.0     U     1000   0        0 eth2

default         10.11.12.1      0.0.0.0         UG    0      0        0 eth2
VPN Client Ubuntu 9.04 Network Manager Routing Table
© 2005-2026 Craig Mayhew